In this project i showed you how to make a wireless voltmeter using arduino and RF 433MHz receiver and transmitter.
You can use this code and concept for many other projects, any project which used sensor with analog voltage output to sense temperature, gas leakage or light , etc.
For example you can put a LM35 temperature sensor rather than potantiometer, you just have to putting its formula which convert LM35 output pin voltage to exact temperature.
You also can make a wireless AC or DC power meter by doing some change in code and hardware (using hall effect current sensor and single phase voltage sensor).
This type of RF module has distance range up to 200 meters according to datasheet but when i bought this RF module from Aliexpress its distance rang was very low, but i set its adjustable RF coil very carefully and i get very higher distance rang.(Don't play with RF coil if your module works good), You also have to use a 6 inch antenna to increase distance range to max as possible.
This RF module is cheap and simple to use and suitable to works with 5v.
Parts list:
Arduino any version (2pcs)
RF 433MHz receiver and transmitter
Potentiometer 10K (2pcs)
LCD display 16x2
Download library of RCSwitch.h from this link:
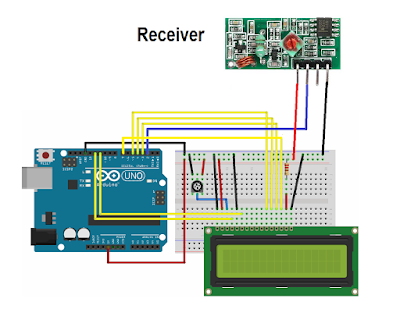
Receiver Wiring:
Receiver Code:
#include <RCSwitch.h>
#include <LiquidCrystal.h>
LiquidCrystal lcd(12, 11, 5, 4, 3, 7);
RCSwitch mySwitch = RCSwitch();
float value;
void setup() {
Serial.begin(9600);
lcd.begin(16, 2);
mySwitch.enableReceive(0);
// Receiver on inerrupt 0 => that is pin #2
}
void loop() {
lcd.clear();
if (mySwitch.available()) {
int value = mySwitch.getReceivedValue();
lcd.setCursor(0,0);
lcd.print("Voltage=");
if (value == 0) {
Serial.print("Unknown encoding");
} else {
lcd.setCursor(0,1);
lcd.print((value * 5.0)/1024.0);
lcd.print(" ");
delay(500);
}
mySwitch.resetAvailable();
}
}
Transmitter Wiring:
Transmitter Code:
#include <RCSwitch.h>
RCSwitch mySwitch = RCSwitch();
void setup()
{
mySwitch.enableTransmit(7); //Connect data transmitter to Pin7 of Arduino
}
void loop() {
int sensorValue = analogRead(A0);
delay(100);
mySwitch.send(sensorValue , 12);
delay(2000);
}
RCSwitch mySwitch = RCSwitch();
void setup()
{
mySwitch.enableTransmit(7); //Connect data transmitter to Pin7 of Arduino
}
void loop() {
int sensorValue = analogRead(A0);
delay(100);
mySwitch.send(sensorValue , 12);
delay(2000);
}
Video:
In this video you can see how this project works


